無料で構築するVPN(OpenVPN) Part.1
OpenVPNは高いコストを掛けずに構築が可能なVPNです。
今回はCentOSを基にして構築していきます。
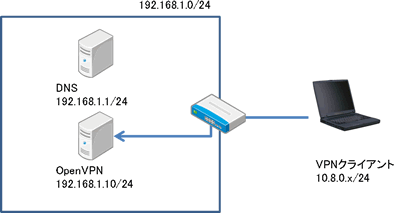
構成は下記となります。
RPMforgeリポジトリ導入(RPMforge)
RPMforgeリポジトリを導入して、標準リポジトリで提供されないパッケージを
yumでインストールできるようにする。
なお、標準リポジトリとRPMforgeリポジトリの両方で提供されるパッケージについて、
yum-prioritiesプラグインを導入して標準リポジトリのパッケージが
RPMforgeリポジトリのパッケージで上書きされてしまわないようにする。
yum-plugin-prioritiesプラグインの導入
・CentOS6の場合
# yum -y install yum-plugin-priorities
・CentOS5の場合
# yum -y install yum-priorities

# cd /etc/yum.repos.d/
# cp -p CentOS-Base.repo CentOS-Base.repo.yymmdd
# vi CentOS-Base.repo
---------------------------------------------------------
[base]
name=CentOS-$releasever - Base
mirrorlist=http://mirrorlist.centos.org/?release=$releasever&arch=$basearch&repo=os
#baseurl=http://mirror.centos.org/centos/$releasever/os/$basearch/
gpgcheck=1
gpgkey=file:///etc/pki/rpm-gpg/RPM-GPG-KEY-CentOS-6
priority=1   ←追加
#released updates

[updates]
name=CentOS-$releasever - Updates
mirrorlist=http://mirrorlist.centos.org/?release=$releasever&arch=$basearch&repo=updates
#baseurl=http://mirror.centos.org/centos/$releasever/updates/$basearch/
gpgcheck=1
gpgkey=file:///etc/pki/rpm-gpg/RPM-GPG-KEY-CentOS-6
priority=1   ←追加
#additional packages that may be useful

[extras]
name=CentOS-$releasever - Extras
mirrorlist=http://mirrorlist.centos.org/?release=$releasever&arch=$basearch&repo=extras
#baseurl=http://mirror.centos.org/centos/$releasever/extras/$basearch/
gpgcheck=1
gpgkey=file:///etc/pki/rpm-gpg/RPM-GPG-KEY-CentOS-6
priority=1   ←追加
---------------------------------------------------------
RPMforgeリポジトリ導入
# cd /usr/local/src/
・CentOS6の場合
# wget http://pkgs.repoforge.org/rpmforge-release/rpmforge-release-0.5.2-2.el6.rf.i686.rpm
# rpm -ivh rpmforge-release-0.5.2-2.el6.rf.i686.rpm
・CentOS5の場合
# wget http://pkgs.repoforge.org/rpmforge-release/rpmforge-release-0.5.2-2.el5.rf.i386.rpm
# rpm -ivh rpmforge-release-0.5.2-2.el5.rf.i386.rpm

# yum -y update rpmforge-release
OpenVPNのインストール
OpenVPNをインストールして各種設定を行います。
# yum -y install openvpn
OpenVPN設定
CA証明書、秘密鍵作成
# cp -pR /usr/share/doc/openvpn-2.2.2/easy-rsa/2.0/ /etc/openvpn/easy-rsa
# cd /etc/openvpn/easy-rsa/
# chmod +x *
正規表現に「?」を追加
# vi whichopensslcnf
---------------------------------------------------------
elif $OPENSSL version | grep -E "1\.0\.([[:digit:]][[:alnum:]]?)" > /dev/null; then
---------------------------------------------------------
証明書/鍵作成用環境変数設定ファイル編集
# vi vars
---------------------------------------------------------
export KEY_COUNTRY="JP"
export KEY_PROVINCE="Tokyo"
export KEY_CITY="Minato-ku"
export KEY_ORG="openvpn.web-arena.com"
export KEY_EMAIL=openvpn@web-arena.com
export KEY_CN="openvpn.web-arena.com CA"
export KEY_NAME=
export KEY_OU=
export PKCS11_MODULE_PATH=
export PKCS11_PIN=
---------------------------------------------------------
証明書/鍵作成用環境変数設定ファイル内容をシステムに反映
# source vars
証明書/鍵作成先ディレクトリ初期化
※OpenVPNインストール後最初の1回のみ
# ./clean-all
CA証明書、秘密鍵作成
# ./build-ca
---------------------------------------------------------
Generating a 1024 bit RSA private key
....++++++
...................................................++++++
writing new private key to 'ca.key'
-----
You are about to be asked to enter information that will be incorporated
into your certificate request.
What you are about to enter is what is called a Distinguished Name or a DN.
There are quite a few fields but you can leave some blank
For some fields there will be a default value,
If you enter '.', the field will be left blank.
-----
Country Name (2 letter code) [JP]:  ←空Enter
State or Province Name (full name) [Tokyo]:  ←空Enter
Locality Name (eg, city) [Minato-ku]:  ←空Enter
Organization Name (eg, company) [openvpn.web-arena.com]:  ←空Enter
Organizational Unit Name (eg, section) []:  ←空Enter
Common Name (eg, your name or your server's hostname) [openvpn.web-arena.com CA]:  ←空Enter
Name []:  ←空Enter
Email Address [openvpn@web-arena.com]:  ←空Enter
---------------------------------------------------------
CA証明書をOpenVPN設定ファイル格納ディレクトリへコピー
# cp -p keys/ca.crt /etc/openvpn/
サーバ証明書、秘密鍵作成
# ./build-key-server server
---------------------------------------------------------
Generating a 1024 bit RSA private key
......++++++
......................................................................................++++++
writing new private key to 'server.key'
-----
You are about to be asked to enter information that will be incorporated
into your certificate request.
What you are about to enter is what is called a Distinguished Name or a DN.
There are quite a few fields but you can leave some blank
For some fields there will be a default value,
If you enter '.', the field will be left blank.
-----
Country Name (2 letter code) [JP]:  ←空Enter
State or Province Name (full name) [Tokyo]:  ←空Enter
Locality Name (eg, city) [Minato-ku]:  ←空Enter
Organization Name (eg, company) [openvpn.web-arena.com]:  ←空Enter
Organizational Unit Name (eg, section) []:  ←空Enter
Common Name (eg, your name or your server's hostname) [server]:  ←空Enter
Name []:  ←空Enter
Email Address [openvpn@web-arena.com]:  ←空Enter
Please enter the following 'extra' attributes
to be sent with your certificate request
A challenge password []:  ←空Enter
An optional company name []:  ←空Enter
Using configuration from /etc/openvpn/easy-rsa/openssl-1.0.0.cnf
Check that the request matches the signature
Signature ok
The Subject's Distinguished Name is as follows
countryName           :PRINTABLE:'JP'
stateOrProvinceName   :PRINTABLE:'Tokyo'
localityName          :PRINTABLE:'Minato-ku'
organizationName      :PRINTABLE:'openvpn.web-arena.com
commonName            :PRINTABLE:'server'
emailAddress          :IA5STRING:'openvpn@web-arena.com'
Certificate is to be certified until Jan 16 07:41:03 2023 GMT (3650 days)
Sign the certificate? [y/n]:y  ←y応答
1 out of 1 certificate requests certified, commit? [y/n]y  ←y応答
Write out database with 1 new entries
Data Base Updated
---------------------------------------------------------
サーバ証明書をOpenVPN設定ファイル格納ディレクトリへコピー
# cp -p keys/server.crt /etc/openvpn/
サーバ秘密鍵をOpenVPN設定ファイル格納ディレクトリへコピー
# cp -p keys/server.key /etc/openvpn/
DH(Diffie Hellman)パラメータ作成
# ./build-dh
DHパラメータをOpenVPN設定ファイル格納ディレクトリへコピー
# cp -p keys/dh1024.pem /etc/openvpn/
証明書廃止リスト作成
将来的にクライアント証明書を廃止できるようにするため、証明書廃止リストを作成する。
※証明書廃止リストは、実際にクライアント証明書を作成してから廃止を行わないと
作成できないので、ダミーのクライアント証明書をいったん作成&廃止することにより
証明書廃止リストを作成する
ダミーのクライアント証明書作成
# ./build-key dmy
※空Enterとy応答
OpenSSL設定ファイル編集
・CentOS6の場合
# vi openssl-1.0.0.cnf
・CentOS5の場合
# vi openssl.cnf
---------------------------------------------------------
※行頭に"#"を追加し、コメントアウト
#[ pkcs11_section ]
#engine_id = pkcs11
#dynamic_path = /usr/lib/engines/engine_pkcs11.so
#MODULE_PATH = $ENV::PKCS11_MODULE_PATH
#PIN = $ENV::PKCS11_PIN
#init = 0
---------------------------------------------------------
ダミーのクライアント証明書廃止
# ./revoke-full dmy
証明書廃止リストをOpenVPN設定ファイル格納ディレクトリへコピー
# cp -p keys/crl.pem /etc/openvpn/
証明書/鍵作成用ディレクトリを抜ける
# cd
なんか記事が長くなってきたので、Part.2へ続く